I’ve been told that after you give birth, you forget how painful it was. This is what allows women to have the courage to face the task a second time. Having never birthed a child, I have no idea if this is true. I can say it is completely accurate about windows.
My house has 28 windows. TWEN-TY EIGGGGHT. Fourteen in each apartment. I haven’t touched my tenants windows, the thought of putting them through this trial is repugnant to me. Out of the 14 windows in my apartment, I have restored five. Each time I think this task will take me only a weekend! In the past six months or more, I have managed five.
In my defense, the kitchen windows were a huge project, not just a restoration. But still.
So I start this post with the blissful idea that we are going to restore a window this weekend. Let’s see how far we get with two solid days and nights of work.
DAY ONE PART ONE: Removing the window sashes.
LIQUID COURAGE: Perc’s Ethiopian Kochere Coffee
WARNINGS: Please don’t fall out of a window.
 This is a stop. It holds the bottom window sash in place and keeps it from falling out of the window. The first step is to pry this off with a crow bar. Usually it is nailed in place. In fact, depending on how frustrating the previous owners of your home were, it might be held on with half a box of screws. We attempt to retrieve it in one piece so we can reuse it.
First sash removed!
Once the first sash is removed, you can access the weight panels. Each is usually held on with one screw near the bottom. This might require breaking a seal of paint with a box cutter. Once it is open, check to make sure that all four weights are accounted for.


So the next step would be a lot easier… if… I wasn’t on the second floor. To remove the upper sash, or outer sash, you COULD remove the same stop on the other side of the window. Because I can’t fly and don’t like the idea of falling down, I am working from the inside. 
This is the center stop. It separates the two sashes. It fits into a crevice. It would be easy to remove if both sashes were out, but it is very difficult to remove when the upper sash is still in.
Usually it takes an hour to pry both of them out, and usually it breaks in half right about where my hand is, because the upper sash overlaps it there.
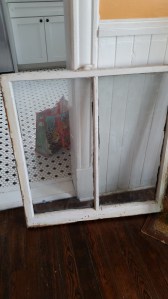
 Removing the second sash is a matter of prying, wiggling, praying, and not falling out of the window. Emphasis on the last part. This one, thank the universe, was not nailed closed. And once both windows are removed, you have an empty window frame that looks like this, a rainbow of layers of paint, dirt, and even the nice old cocoon to decorate it.
DAY ONE PART TWO: Sanding your window frame.
LIQUID COURAGE: Perc’s Ethiopian Kochere Coffee (but it’s cold)
WARNINGS: Please don’t fall out of a window, like really now.
The first window I did, I spent HOURS sanding the window frame all the way down to bare wood, using my random orbit sander and by hand. It was beautiful when I was finished. Repainting it made me cry. Nowadays, I care less. I’m mostly looking to SMOOTH the window frame. Anything that might prevent the window from gliding up and down, globs of paint, old caulk, dead bugs, nails, splintering wood, it’s all gotta go. But I don’t so much care if it is all the same color. I’m going to paint it anyway.
Here it is sanded down. It took me about two hours to get it in shape.
DAY ONE PART THREE: Building a Screen
LIQUID COURAGE: Savannah Bourbon Company, Savannah 88
WARNINGS: ya gonna get dirty
Step one, measure your window. Step two, measure again. Step three, again and again.
 Cut your wood to size with a 45 degree angle on the ends. Make sure your ends form an isosceles trapezoid rather than a rhombus. (And how is THAT for some elementary school math.)
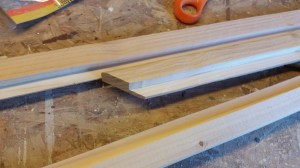
Then route an edge on the inner (shorter) side of each piece. This is the part where you get stupid dirty.
Attach the four pieces on the corners with brackets. Also please note the amount of saw dust on the floor and understand that the same amount is on me.


Then the screen frame gets painted. I like to use a super gloss marine paint. It’s oil based and will help fight the water that will inevitably get on the windows. And hurry up and wait, because the oil paint takes nearly 24 hours to dry. (This is part of why I have unrealistic expectations on how long this process takes.)
DAY ONE PART FOUR: Removing the glass
LIQUID COURAGE: Savannah Bourbon Company, Savannah 88
WARNINGS: try not to break the glass
Glass is held into a wooden window with two things, glazing and glazing points. Glazing is kinda like stinky, oily play dough when it is wet, and it dries something like plaster. Removing it is a labor of love.


Very old glazing will chip off in huge clumps. Newer glazing will slowly erode as if you were carving plaster. And the asshole that sealed a window with caulk will cause you to swear, because that stuff is damn near impossible without a heat gun. While you are chipping away at the glaze, being careful not to crack the glass, you will encounter tiny pieces of metal. These are the points. Their main job is to hold the glass still while the glaze cures when the glass is new, and to ruin your chisel when the glass is old.
 The is the very first window I have successfully removed four pieces of glass. Most of them have cracked glass before I even start, so I’m not entirely to blame.
Shower off the saw dust, sleep.
DAY TWO PART ONE: Stripping the paint
LIQUID COURAGE: Perc’s Ethiopian Kochere Coffee
WARNINGS: wear a mask. LEAD PAINT
Tools include a belt sander and a random orbit sander. I use 60 grit sandpaper to strip the paint, anything more will strip more wood than I am comfortable with. Unlike the window frame, in this case we really want to remove all the paint so we can assess the wood under it.
DAY TWO PART TWO: Admitting defeat through wood putty.
LIQUID COURAGE: George Dickle Tennessee Whiskey, Superior No. 12
WARNINGS: sigh deeply
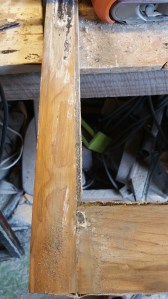
So windows that are 103 years old tend to have one thing in common – damage.
Once the paint was removed, I was able to see huge sections of my sashes that needed some TLC, or more accurately, a generous supply of wood putty. Wood putty does not help if the structure has been compromised. But it can fill holes and help restore shape, which is what both sashes needed. Sadly, it also takes forever to dry, and it isn’t good to “cake” it on. It needs to be built up slowly, and to dry between layers. SOOO, after two generous putty applications, my sashes are not ready to go forward for at least a day. So pour a drink, light tiki torch, spend some time in the garden, and rest assured that windows are like childbirth and next weekend you will forget.